Introduction
At this stage within this module we have researched and discussed server-side technologies to some depth. We discussed web-servers, server-side scripting and database servers which are the components responsible for creating a large percentage of the web applications found in the internet and intranets alike. Server-side technology is key in transforming web sites into a fully fledged web application.
The main objective within this blog entry is to document the development of a web space management system. A web space management system is a web application which provides the user with the ability to store and manage unstructured data on to a server. Unstructured data is data which does not follow the rigid structure found in a database such as documents, images, files and directories. The aforementioned system should also provide the user with the ability to download the files when needed.

As already mentioned before the components needed for such a system to work are;
Task Summary
In this section we will go through the requirements of the web space management system.
The tasks mentioned above will be distributed in this blog entry each in its appropriate section. This document will be divided into various sections. In the first section we will analyse the requirements and design the database in which user details will be stored as well as map the folder structure to be allocated with each user. The second section will focus on the functionality related to the system such as authentication, web space management and file uploading. As well as the user interface that will integrate the previous sections into one final perspective of the system.
Database Design
Let’s start by identifying the entities which are required by the system. We know that we have the user which will make use of the system and with each user a root folder is linked which will be made available to that user. Each user will be categorised into a usergroup. So in all we have three entities; the users, usergroups and the userfolders. The relationship between the users and the usergroups is a 1:1 relationship since we are only allowing the user to have one root folder in this system. We will still allow the possibility for multiple folders by setting a surrogate primary key in the userfolders relation. The relationship between the users and the usergroups relation is a N:1 since a user group can contain multiple users.
The users entity requires the following fields;
The userfolders entity requires the following fields;
FolderName will hold the name given to the root folder linked to the user referenced by UserFK. Path holds the relative path of the folder from the document root directory. FolderMaxSize will hold the maximum space allocated to the user in Bytes. The FolderCurrSize field will hold the current space taken by the user.
The usergroups entity requires the following fields;
The IsAdmin field will determine whether the user can administer the system.
This table lists the relationships between the entities;
The following diagram depicts the ERD for the relations used in the web space management system.

Now that we have a logical view of the database needed by the system the next step is to create the physical database using DDL queries. Throughout this project I used SQLYog to manage my database. First I created the database and the table mentioned in the tables above then I created a schema using the schema designer to enfore integrity constraints within the database.

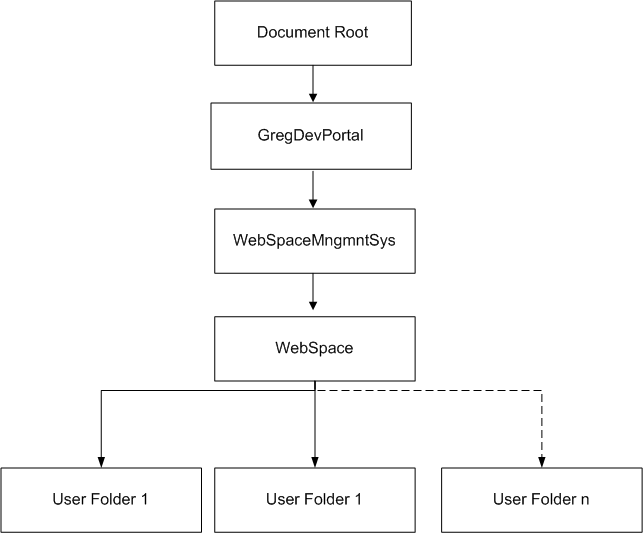
User Folder Structure
Each of the users present in the users table has a root folder. Inside the document root folder a folder named WebSpace was created at the following path;
<document root> / GregDevPortal/ WebSpaceMngmntSys /
Within this folder a folder for each user was created. The folder name given to each user folder is the user name.
Web Application Design and Development
The main idea behind this design is to create a system which is easy to maintain and debug while developing. The image below shows the different pages making up the application as well as the communication between each page. Also the channel between the application and the database as well as the file system is shown.
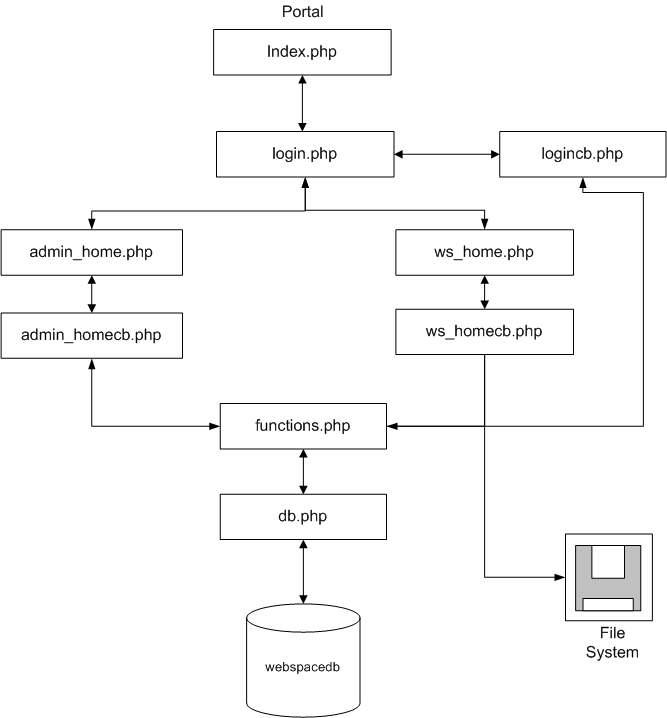
Includes
Various includes were set as to eliminate most of the code from the UI pages in the application. On each page a footer.php was included to depict the footer. Two other pages were set as includes in most of the pages which are function.php which contain most of the database and generic functions as well as a uiFuncs.php which contain functions pertaining the user pages. The function.php includes the db.php file which is a class that handles the connection with the database.Each of the pages mentioned were included using the include() command.
Database Connection
Most of the functions making use of the database needed to have an open connection to the database. Instead of calling the mysql_connect and mysql_select_db functions each time, a class named db.php was created which includes a static property called $con. This property represents the connection to the database in the functions which instantiate the class. Two methods were created within this class one to connect to the database and the other to disconnect.
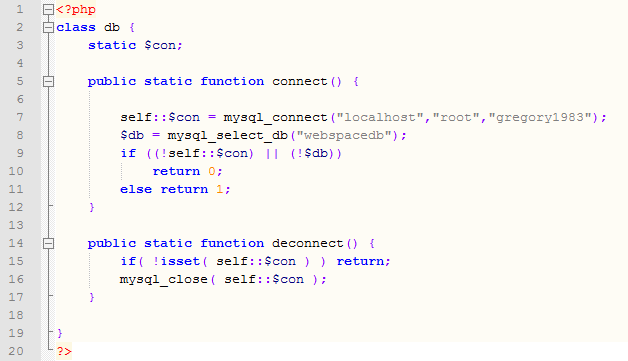
The class is instantiated by calling the php file and making use of the new keyword. Each of the functions is then references using the -> syntax.

Portal
The index page (index.php) is the landing page which is a small portal which shows the user the options available which are to either log into the admin or web space section of the application. Each hyperlink in each of the panels links to a login screen. The distinction between each login type is passed as an arguments within the URL.

From every other page in the system a hyperlink is shown on the header which allows the user to go back to the portal at any time.
Login Screen
The login panel when logged into can be of two types; admin or web space. An admin login type allows an administrator to log into the admin_home.php page while the web space login allows the user to log into the ws_home.php. Each types of logins is shown on the header of the login panel.

On submitting the user name and password the page redirects the user to the code behind of that page. At this point the ws_homecb.php does the following;
The inputted values are screened using a cleaning function to make sure that no malicious code is entered to break the SQL statement.

If the user is validated the data loaded is filled into sessions. The function taking care of assigning sessions is called loadSessions. This function iterates through each of the column generated by the database and for each column that value is assigned to that session variable. Another feature which was already discussed in previous posts is “remember me” checkbox. When checked the user can log in the system without logging in.
Header
Each page within this system displays a header which shows information according to one of two states; logged in or logged out. When logged out the header tells the user that he/she is not currently logged in the system. When logged in user details are displayed as well as the date and time the user logged in. This information is accompanied with a hyperlink which links to the portal and a link which enables the user to change the color scheme of the application.

This last login date is obtained by calling an UPDATE query on the users table and update the LastLoggedIn field with the current date and time every time the user is authenticated within the system.
User Preferences
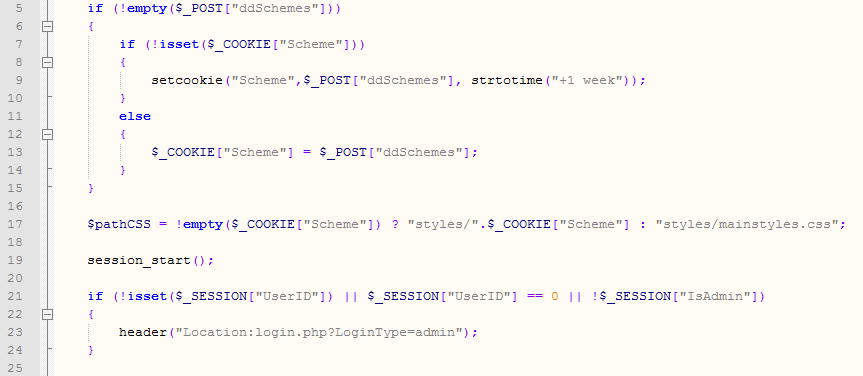
As already explained each of the pages has a header which provides the user with information. Along with the information a link is available which allows the user to change the color scheme for some of the panels in the screen. By clicking on the link the user is redirected to another page changescheme.php.
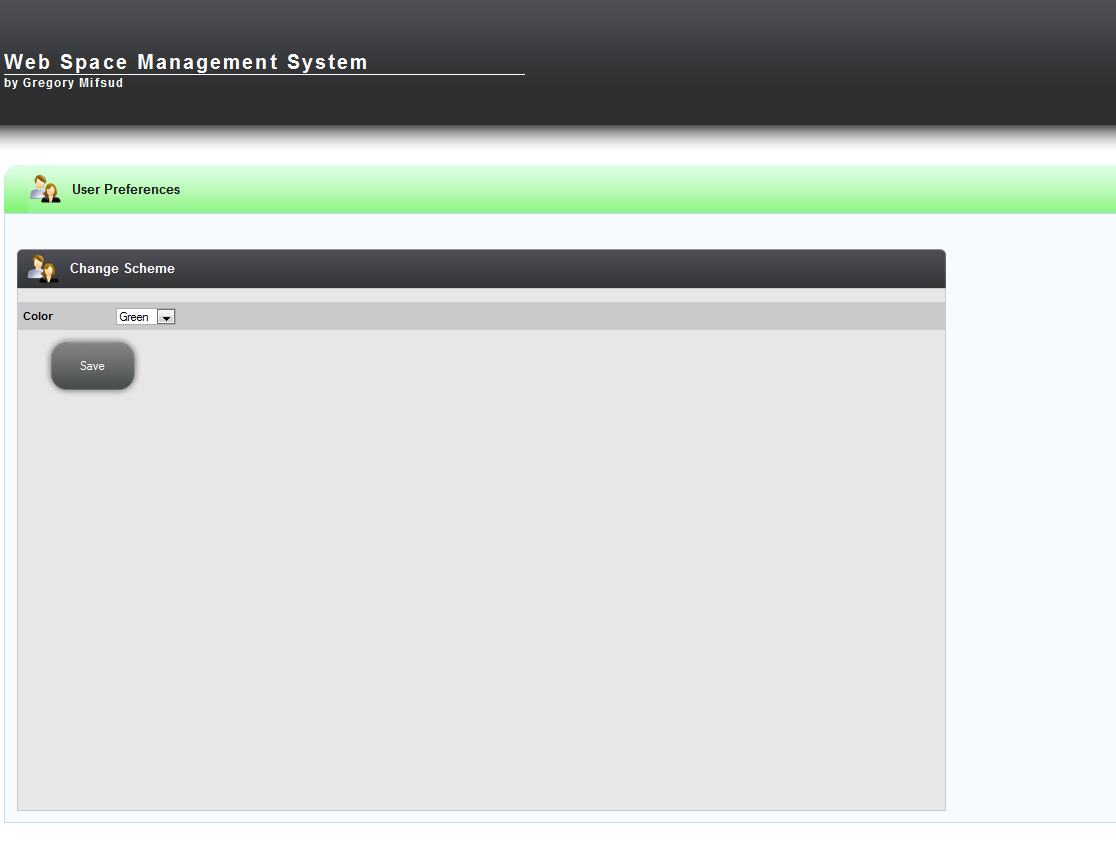
A drop down is made available with color choices which when selected and submitted the page posts on to itself and sets a cookie variable with the appropriate css file. The cookie variable set is $_COOKE[“Scheme”]. The expiry on the cookie is that of one week.
Web Space Screen
The web space screen provides the user with required web space management functionality. In this sub section the various features provided are described in some detail. The web space page is divided into four distinct panels;
Web Space Status
The web space status shows the user three types of information; the maximum space limit available, the free/used storage space and the maximum upload file size. The maximum space limit is read from the userfolders table when the user is validated and loaded. The used space is read from the userfolders table but also quantified in the case the folders were tampered with physically. This is achieved by creating a recursive function that iterates through each file in the user’s folder by using the filesize function. The result is shown in two formats; numeric and visual. The numeric format shows the remaining free space by subtracting the maximum space by the remaining space. Since the size obtained from the filesize function is in bytes another function was created to convert the results to KB.

The visual format shows the used storage space by utilising a custom built function that returns the used space in pixels. The result is plugged into the style attribute of the html element making up the progress bar.

The results are shown in the form of a progress bar.

The upload file size limit is read from the php.ini configuration file. This is achieved by using ini_get('upload_max_filesize') function.
File Upload
The file upload function makes use of the html input element of attribute type file. This element opens a dialogue box into the client’s file system. On accepting the selected file the file path of the file is displayed in the file upload section.

The upload button submits the ws_home.php page using a POST method to the ws_homecb.php page. This code behind page contains most of the intermediate logic between the ui page and the functions.php page. The correct action is determined by checking the $_POST[“btnUpload”] variable. This variable is filled with the value of the button which was clicked. If so the upload function is triggered. The upload function holds a number of validating condition each of which will be described.The first check within this function is made to the file type of the uploaded file. A blacklist array is created with a number of file types that are excluded from being uploaded such as php files. Such files can be have disastrous effects since anyone can upload his/her custom php files which can access the files on the server among other things.

If the file uploaded passes through the file size is checked against the upload file limit read from php.ini. Since the value read from the configuration file is in MB format a function was created to convert the MB to bytes.The file size is also checked against the available free space for the logged user. If any of the mentioned checks fail an error message is displayed in the notification area.

The next condition checks whether the file already exists by using the file_exists() function. If a file with the same name is already available a message is passes as an argument to the page to either confirm update or cancel. We will go into the notification area later.

If confirmed the file is replaced with the uploaded version of the file.
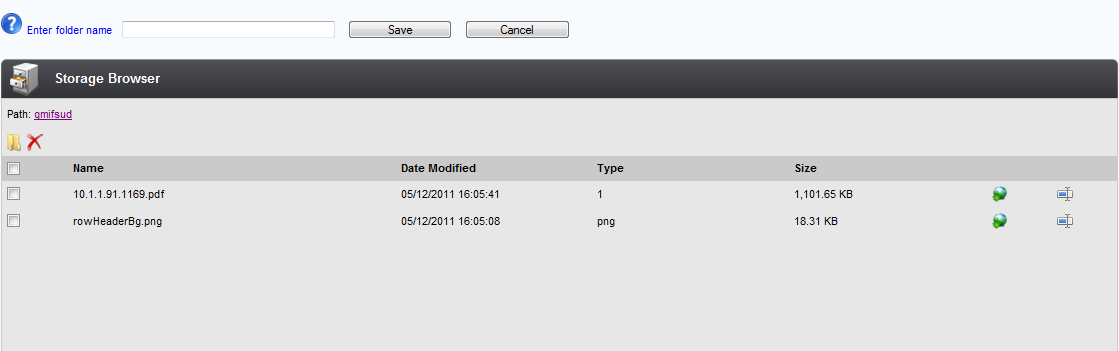
Storage Browser
The storage browser is where uploaded files are managed. This area allows the user to view and navigate through folders and files, create folders, delete multiple files or folders, allow for download of files and renaming of files.
The files and folders are listed in an html table. On loading of this page the session variable holding the current user path is passed as an argument into a function which loads the files and folders. The custom built function uses opendir to open the directory and iterates through each file using the readdir function. The functions returns an array with some information about the file or folder such as ;

Along with the information about each file a navigation bar was created to facilitate moving through the user folder. The was achieved by using anchor tags for each nested folder the user clicks on. A custom build function was placed in uiFuncs.php so to remove most of the logic from the page.

When the new folder icon is triggered the form is submitted to the code behind and the user is asked to enter a folder name. If the user does not enter a value an error message is sent to the notification area. If the process is valid at this point a new directory is created by utilising the function mkdir() which takes the name entered by the user append it to the current user path which is stored in the session variable $_SESSION[“CurrUserPath”].
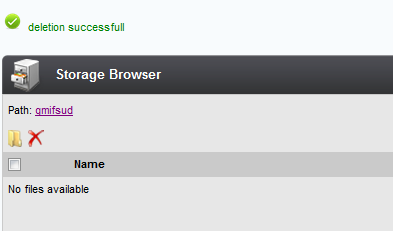
The multi file delete allows the user to delete multiple files or folders simultaneously. This is achieved by assigning chkFileDir[] to each of the checkboxes. The function also checks that at least one checkbox has been selected by iterating through the $_POST[“chkFileDir”] variable. Each of the check box selected has the path of the file or folder as a value. On deletion each of these paths are passed as an arguments to a custom built recursive function delete_dirfiles which makes use of the php function rmdir() to delete directories and unlink() to delete files. If the function is successful a success message is passes to the web space page.
The download button is placed in a cell within each of the rows containing a file. Files are differentiated from folders by using the property filetype when we first loaded the files from the user root directory. The download function in the code behind of the page was achieved by calling the readfile() function accompanied with header('Content-disposition: attachment; filename='.$filename). This creates a forced download which opens a dialogue window on the user’s screen which allows the user to choose a folder in which to save the file.

The last feature available in the storage browser is the rename function. This functions uses the php function rename() to rename a file. The button next to each file or folder triggers a custom built function which asks the user for the new file name. In the text field the current file or folder name is shown.

When the user clicks on OK the file/folder is renamed and a success message is passed to the page.
Notifications
Throughout previous sections different messages were passed to the user. Most of the messages shown can be categorised as;
The success message is displayed after a successful action has been applied such as the creation of a folder or the upload of a file. When the action is successful the header(“Location:<URL>”) calls the page and passes a SuccessMsg parameter along with the message that is to be displayed.

The error message is returned whenever an error occurs within a function. An ErrorMsg parameter is passed along with the error message thrown.
The question message is a little more elaborate since we are waiting for the user to trigger an event of some sort. To achieve this I created a three functions in the uiFuncs.php which do the following;

The dialogueBox shows the user the message and two buttons each with name passes in the $dialogueId variable. Each of the buttons take the value passes in $yes and $no respectively.
The inputField function shows the message a text box and two buttons. This functions is used when a textual input is required from the user. The third function is the same as the inputField function with a distinct difference that a value is passes into the text box shown to the user. The result from passing these parameters to the respective page is to display an icon according to the type of message along with the generated html elements.

Admin Page
The admin page allows the administrator to change the maximum limit on user folders. This is achieved since we established a usergroups table which specified whether the user is an administrator. The page hosting the functionality is admin_home.php and the code behind page is admin_homecb.php.

The functionality for this screen is achieved by using the [] syntax next to the text box name. On post back the code behind iterates through the $POST[“txtFolderMaxSize”] variable and updates the table userfolders.
Conclusion
I had a great experience developing this software apart from the fact that I learned a lot the was really amazed at the amount of resources out there on the web with regards to PHP. I fully intend to continue using PHP on personal projects. Doing this project exposed me to a number of new tools such as Notepad ++ and SQLYog.
At this stage within this module we have researched and discussed server-side technologies to some depth. We discussed web-servers, server-side scripting and database servers which are the components responsible for creating a large percentage of the web applications found in the internet and intranets alike. Server-side technology is key in transforming web sites into a fully fledged web application.
The main objective within this blog entry is to document the development of a web space management system. A web space management system is a web application which provides the user with the ability to store and manage unstructured data on to a server. Unstructured data is data which does not follow the rigid structure found in a database such as documents, images, files and directories. The aforementioned system should also provide the user with the ability to download the files when needed.
As already mentioned before the components needed for such a system to work are;
- Web Server: The web server will host the files making up the system as well as host the files uploaded and managed by the user.
- Server-side scripting: The scripting language is a liaison between the web server and the user. The scripting language is what provides the user with the needed functionality to manage his/her web space.
- Database-server: The database server stores the different users making use of the system. This will allow for customisation such as disk space allowed, the location of the user root location.
Task Summary
In this section we will go through the requirements of the web space management system.
- The system should be suitable to handle content of various types.
- Allow the user to add and organise files to a personal web area which is secured by password.
- Application should be accessible over the Internet.
- User names and password should be stored in a MySQL database.
- Once the web space is accessed the user should be able to;
- Make and delete directories.
- Delete files.
- Upload new files.
- Users should only access their web space and have limit imposed upon it.
- Consider security implication with regards to user names and passwords.
The tasks mentioned above will be distributed in this blog entry each in its appropriate section. This document will be divided into various sections. In the first section we will analyse the requirements and design the database in which user details will be stored as well as map the folder structure to be allocated with each user. The second section will focus on the functionality related to the system such as authentication, web space management and file uploading. As well as the user interface that will integrate the previous sections into one final perspective of the system.
Database Design
Let’s start by identifying the entities which are required by the system. We know that we have the user which will make use of the system and with each user a root folder is linked which will be made available to that user. Each user will be categorised into a usergroup. So in all we have three entities; the users, usergroups and the userfolders. The relationship between the users and the usergroups is a 1:1 relationship since we are only allowing the user to have one root folder in this system. We will still allow the possibility for multiple folders by setting a surrogate primary key in the userfolders relation. The relationship between the users and the usergroups relation is a N:1 since a user group can contain multiple users.
The users entity requires the following fields;
| Field Name | Data Type |
| UserID – PK | Int |
| UserName | Varchar |
| FirstName | Varchar |
| Surname | Varchar |
| Varchar | |
| Password | Varchar |
| UserGroupFK – FK | Int |
| LastLoggedIn | Datetime |
The userfolders entity requires the following fields;
| Field Name | Data Type |
| UserFolderID – PK | Int |
| FolderName | Varchar |
| Path | Varchar |
| UserFK – FK | Int |
| FolderMaxSize | Decimal |
| FolderCurrSize | Decimal |
FolderName will hold the name given to the root folder linked to the user referenced by UserFK. Path holds the relative path of the folder from the document root directory. FolderMaxSize will hold the maximum space allocated to the user in Bytes. The FolderCurrSize field will hold the current space taken by the user.
The usergroups entity requires the following fields;
| Field Name | Data Type |
| UserGroupID | Int |
| UserGroupName | Varchar |
| IsAdmin | Boolean |
The IsAdmin field will determine whether the user can administer the system.
This table lists the relationships between the entities;
| Entity Name | Relates To |
| users | N:1 to usergroups |
| userfolders | 1:1 to users |
| Usergroups | 1:N to users |
The following diagram depicts the ERD for the relations used in the web space management system.
Now that we have a logical view of the database needed by the system the next step is to create the physical database using DDL queries. Throughout this project I used SQLYog to manage my database. First I created the database and the table mentioned in the tables above then I created a schema using the schema designer to enfore integrity constraints within the database.
User Folder Structure
Each of the users present in the users table has a root folder. Inside the document root folder a folder named WebSpace was created at the following path;
<document root> / GregDevPortal/ WebSpaceMngmntSys /
Within this folder a folder for each user was created. The folder name given to each user folder is the user name.
Web Application Design and Development
The main idea behind this design is to create a system which is easy to maintain and debug while developing. The image below shows the different pages making up the application as well as the communication between each page. Also the channel between the application and the database as well as the file system is shown.
Includes
Various includes were set as to eliminate most of the code from the UI pages in the application. On each page a footer.php was included to depict the footer. Two other pages were set as includes in most of the pages which are function.php which contain most of the database and generic functions as well as a uiFuncs.php which contain functions pertaining the user pages. The function.php includes the db.php file which is a class that handles the connection with the database.Each of the pages mentioned were included using the include() command.
Database Connection
Most of the functions making use of the database needed to have an open connection to the database. Instead of calling the mysql_connect and mysql_select_db functions each time, a class named db.php was created which includes a static property called $con. This property represents the connection to the database in the functions which instantiate the class. Two methods were created within this class one to connect to the database and the other to disconnect.
The class is instantiated by calling the php file and making use of the new keyword. Each of the functions is then references using the -> syntax.
Portal
The index page (index.php) is the landing page which is a small portal which shows the user the options available which are to either log into the admin or web space section of the application. Each hyperlink in each of the panels links to a login screen. The distinction between each login type is passed as an arguments within the URL.
From every other page in the system a hyperlink is shown on the header which allows the user to go back to the portal at any time.
Login Screen
The login panel when logged into can be of two types; admin or web space. An admin login type allows an administrator to log into the admin_home.php page while the web space login allows the user to log into the ws_home.php. Each types of logins is shown on the header of the login panel.
On submitting the user name and password the page redirects the user to the code behind of that page. At this point the ws_homecb.php does the following;
- Validates the user according to the login type
- If valid connects to the database
- Loads user and user folder details
- Set the loaded values into sessions
- Determined by the login type the user is redirected to the web space or the admin page
The inputted values are screened using a cleaning function to make sure that no malicious code is entered to break the SQL statement.
If the user is validated the data loaded is filled into sessions. The function taking care of assigning sessions is called loadSessions. This function iterates through each of the column generated by the database and for each column that value is assigned to that session variable. Another feature which was already discussed in previous posts is “remember me” checkbox. When checked the user can log in the system without logging in.
Header
Each page within this system displays a header which shows information according to one of two states; logged in or logged out. When logged out the header tells the user that he/she is not currently logged in the system. When logged in user details are displayed as well as the date and time the user logged in. This information is accompanied with a hyperlink which links to the portal and a link which enables the user to change the color scheme of the application.
This last login date is obtained by calling an UPDATE query on the users table and update the LastLoggedIn field with the current date and time every time the user is authenticated within the system.
User Preferences
As already explained each of the pages has a header which provides the user with information. Along with the information a link is available which allows the user to change the color scheme for some of the panels in the screen. By clicking on the link the user is redirected to another page changescheme.php.
Web Space Screen
The web space screen provides the user with required web space management functionality. In this sub section the various features provided are described in some detail. The web space page is divided into four distinct panels;
- Web Space Status
- Notifications
- File Upload
- Storage Browser
Web Space Status
The web space status shows the user three types of information; the maximum space limit available, the free/used storage space and the maximum upload file size. The maximum space limit is read from the userfolders table when the user is validated and loaded. The used space is read from the userfolders table but also quantified in the case the folders were tampered with physically. This is achieved by creating a recursive function that iterates through each file in the user’s folder by using the filesize function. The result is shown in two formats; numeric and visual. The numeric format shows the remaining free space by subtracting the maximum space by the remaining space. Since the size obtained from the filesize function is in bytes another function was created to convert the results to KB.
The visual format shows the used storage space by utilising a custom built function that returns the used space in pixels. The result is plugged into the style attribute of the html element making up the progress bar.
The results are shown in the form of a progress bar.
The upload file size limit is read from the php.ini configuration file. This is achieved by using ini_get('upload_max_filesize') function.
File Upload
The file upload function makes use of the html input element of attribute type file. This element opens a dialogue box into the client’s file system. On accepting the selected file the file path of the file is displayed in the file upload section.
The upload button submits the ws_home.php page using a POST method to the ws_homecb.php page. This code behind page contains most of the intermediate logic between the ui page and the functions.php page. The correct action is determined by checking the $_POST[“btnUpload”] variable. This variable is filled with the value of the button which was clicked. If so the upload function is triggered. The upload function holds a number of validating condition each of which will be described.The first check within this function is made to the file type of the uploaded file. A blacklist array is created with a number of file types that are excluded from being uploaded such as php files. Such files can be have disastrous effects since anyone can upload his/her custom php files which can access the files on the server among other things.
If the file uploaded passes through the file size is checked against the upload file limit read from php.ini. Since the value read from the configuration file is in MB format a function was created to convert the MB to bytes.The file size is also checked against the available free space for the logged user. If any of the mentioned checks fail an error message is displayed in the notification area.
The next condition checks whether the file already exists by using the file_exists() function. If a file with the same name is already available a message is passes as an argument to the page to either confirm update or cancel. We will go into the notification area later.
If confirmed the file is replaced with the uploaded version of the file.
Storage Browser
The storage browser is where uploaded files are managed. This area allows the user to view and navigate through folders and files, create folders, delete multiple files or folders, allow for download of files and renaming of files.
The files and folders are listed in an html table. On loading of this page the session variable holding the current user path is passed as an argument into a function which loads the files and folders. The custom built function uses opendir to open the directory and iterates through each file using the readdir function. The functions returns an array with some information about the file or folder such as ;
- File Name
- File Type: directory or file
- File path
- File Modification Date
- File Size
- File Mime Type by using the filetype function
Along with the information about each file a navigation bar was created to facilitate moving through the user folder. The was achieved by using anchor tags for each nested folder the user clicks on. A custom build function was placed in uiFuncs.php so to remove most of the logic from the page.
When the new folder icon is triggered the form is submitted to the code behind and the user is asked to enter a folder name. If the user does not enter a value an error message is sent to the notification area. If the process is valid at this point a new directory is created by utilising the function mkdir() which takes the name entered by the user append it to the current user path which is stored in the session variable $_SESSION[“CurrUserPath”].
The multi file delete allows the user to delete multiple files or folders simultaneously. This is achieved by assigning chkFileDir[] to each of the checkboxes. The function also checks that at least one checkbox has been selected by iterating through the $_POST[“chkFileDir”] variable. Each of the check box selected has the path of the file or folder as a value. On deletion each of these paths are passed as an arguments to a custom built recursive function delete_dirfiles which makes use of the php function rmdir() to delete directories and unlink() to delete files. If the function is successful a success message is passes to the web space page.
The download button is placed in a cell within each of the rows containing a file. Files are differentiated from folders by using the property filetype when we first loaded the files from the user root directory. The download function in the code behind of the page was achieved by calling the readfile() function accompanied with header('Content-disposition: attachment; filename='.$filename). This creates a forced download which opens a dialogue window on the user’s screen which allows the user to choose a folder in which to save the file.
When the user clicks on OK the file/folder is renamed and a success message is passed to the page.
Notifications
Throughout previous sections different messages were passed to the user. Most of the messages shown can be categorised as;
- Successful Message
- Question Message
- Error Message
The success message is displayed after a successful action has been applied such as the creation of a folder or the upload of a file. When the action is successful the header(“Location:<URL>”) calls the page and passes a SuccessMsg parameter along with the message that is to be displayed.
The error message is returned whenever an error occurs within a function. An ErrorMsg parameter is passed along with the error message thrown.
The question message is a little more elaborate since we are waiting for the user to trigger an event of some sort. To achieve this I created a three functions in the uiFuncs.php which do the following;
The dialogueBox shows the user the message and two buttons each with name passes in the $dialogueId variable. Each of the buttons take the value passes in $yes and $no respectively.
The inputField function shows the message a text box and two buttons. This functions is used when a textual input is required from the user. The third function is the same as the inputField function with a distinct difference that a value is passes into the text box shown to the user. The result from passing these parameters to the respective page is to display an icon according to the type of message along with the generated html elements.
Admin Page
The admin page allows the administrator to change the maximum limit on user folders. This is achieved since we established a usergroups table which specified whether the user is an administrator. The page hosting the functionality is admin_home.php and the code behind page is admin_homecb.php.
The functionality for this screen is achieved by using the [] syntax next to the text box name. On post back the code behind iterates through the $POST[“txtFolderMaxSize”] variable and updates the table userfolders.
Conclusion
I had a great experience developing this software apart from the fact that I learned a lot the was really amazed at the amount of resources out there on the web with regards to PHP. I fully intend to continue using PHP on personal projects. Doing this project exposed me to a number of new tools such as Notepad ++ and SQLYog.
No comments:
Post a Comment